Instructions
Design parts

Start designing parts
This is how you start designing parts in our cad-tool The Forge
Start designing parts
- Login or register
- Click on "Create Shape" and give the part a name and which project it belongs to.
- Create a shape (shown in grey color on the canvas).
- Create a hole (shown in white color on the canvas).
- Add folds.
- Choose material and thickness.
- Look at your part in 3D. Click to enlarge.
- Look at you drawing, mirror, measure and scale. All measurements are in mm.
- Add part to cart.
- Go to checkout.

Change and add
Change and add
Change and add
- Access the settings for your part by clicking anywhere on the grey surface.
- Access the hole settings by clicking anywhere in the current hole.
- All measurements displayed in a box can be adjusted by double-clicking on the box.
- Change a specific corner radius by clicking the point in the corner. It is also possible to change all corner radii; proceed as in step 1 for the part or step 2 for holes.
- Add more points by clicking anywhere on the current cutting line.
- Drag the points to shape the part.


Combine multiple shapes into one part
Combine shapes and holes to create a single part.
Combine multiple shapes into one part
- A hole appears in white on the drawing surface.
- A shape appears in grey on the drawing surface.
- Combine the different shapes and holes to create your desired design. To correctly make the part with a full outer cutting line, you need to connect all shapes and holes together.


Mirror, scale and measure
Mirror, scale and measure
- Flip the part vertically or horizontally by clicking one of these buttons in the black box at the top right.
- If you want to change the scale or measure your part, click the ‘Show’ button.
- Change the scale by double-clicking on either the height or width measurements.
- To measure between different cutting lines on the part, click the ‘Measure’ button.


Create groups
All shapes and holes are separate. To move or copy the entire part with all holes and shapes (for example), you need to create a group.
Create groups
- Click any shape or hole you want to create a group with, then select ‘New group’.
- After that, click on a hole or shape that should be in the same group and select ‘Group 1’. Continue doing so with all shapes and holes that should be in the same group.
- When the group is complete, you can move or copy the entire group by dragging or clicking the text that says ‘Group 1’.
- You can create several groups after making Group 1. Follow the same process as in step 1. The next group will then become Group 2. Then click the holes and shapes that should be in Group 2.


Lock your drawing
All shapes and holes are separate, which means you can move an individual hole or piece of material – not the entire drawing. This is an advantage while you are working on creating your part, but it can also cause problems if you accidentally move something. It is not always easy to detect if this has happened. Therefore, we recommend that you lock the drawing when you are finished so that no accidental changes are made. We also recommend that you check all measurements carefully before ordering to ensure that the drawing is correct.
Lock your drawing
- Click on material (the grey surface), then tick the box next to the padlock. The material, including the holes, is now locked, BUT the drawing is only locked as long as you drag and move the material. The holes can still be moved.
- To lock the entire drawing, you must lock all holes and materials in the drawing. You can click on each hole you want to lock separately, or you can lock an entire group. Read the chapter ‘Create groups’ for more information.
- If only one hole is locked, dragging it will move the entire drawing.
- If you drag and move a hole that has not been locked, you will only move that hole.


Upload files

How the file should look
File formats that can be uploaded to the tool are DXF/DWG/STEP.

In order for us to cut your files as quickly as possible with the best results, the file must meet certain criteria.
- Accepted file formats are DXF/DWG/STEP
- The file may only contain one part.
- The file may only contain cut lines and bend lines.
- No lines may cross each other.
- All tracks must be interconnected.
- Cut-outs and holes must be at least 50% of the material’s thickness.

Example of what an approved drawing might look like
- Text in the file must be shapes/text outlines.
- The shapes/text outlines must be connected with “bridges”, so they do not fall out.
- Remember to adjust the size of the text to the thickness of the material. If the text is too small, it can impair the cutting result. Cut-outs and holes must be at least 50% of the thickness of the material.

Example of how a text looks with “bridges”
How to upload a file
Here's how to upload dxf/dwg files into our design tool, The Forge.
How to upload a file
- Log in/Register
- Click ‘From dxf/dwg’ and then select the file you want to upload. You can upload one file at a time.
- Tip! You can also drag the file directly onto the empty white drawing area.
Useful information about files containing bend lines
If your file contains bend lines, you must manually change the angle of each bend line. Read more in the section ‘Bending’.

Bending

Adding bend lines
Adding bend lines
- Add a bend line by clicking ‘Bend line’.
- Click the bend line to change its settings.
- Please note that the bend lines must not cross each other. In this example, you can see that the bend lines turn red and therefore cannot be bent.
- In the 3D view, you can see what the part will look like when it is bent. Click the 3D icon to enlarge it.
- Check your drawing by clicking the black box at the top right. The dotted lines are bend lines. The drawing as it appears in this box is the production file that is sent to us. You can adjust the scale of your file in this mode by clicking the dimensions. It is also possible to mirror the part.
Useful information about files containing bend lines
If your file contains bend lines, you must manually change the angle of each bend line.


Ordering & Shipping

How to place an order
Here's how to add items to your basket and finalise your order.
How to place an order
- When you feel ready with your part, check everything in the black box at the top right. The drawing in this box is the production file that is sent to us.
- Before you can add the part to your basket, select the material and thickness.
- Then add the part to your basket.
- Select the number of parts by proceeding to checkout. If you have several different parts to order, repeat the procedure.
- At checkout, you will see an overview of your order with all parts.
- If you change the number of parts, the price will change.
- It is also possible to change the material and thickness.
- Fill in all your details.
- Place your order. It will be reviewed as soon as possible – usually within 5 minutes during office hours. Please notify us within this time if any changes are needed. Delivery time is normally 1 working day.


Shipping and payment
- Shipped within 24 hours
- Free shipping
- Small and large volumes
- High quality
- Quick and easy ordering
- Delivery across all of Europe
Payment is made by invoice, which will be sent in a separate email within a few days. 30-day payment terms. Sender: Snabbstål Norr AB
Deliveries within Sweden are made by Postnord. We manufacture and ship your order on the same day it is received.

Deliveries outside Sweden are made by UPS. We manufacture and ship your order on the same day it is received.

My account
‘My account’ can be accessed in the toolbar when you are logged in.
My account
- Once you have placed an order, you will automatically be redirected to ‘My account’, where you can view your latest order and track your parcel, among other things.
- In 'Orders’, you can see an overview of all your previous orders. Here, you can reorder parts by clicking on the shopping cart icon for the parts you want to order again.
- In 'Drawings’, you can see all the drawings in your project list. From here, you can easily place an order by clicking on the shopping cart icon for each part.
- You finalise your order at checkout.
- In 'Account settings’, you can change your contact and delivery details and update your password.


What does free shipping mean?
Free shipping
The price you see for your item is always the final price, with absolutely no additional shipping charges. The SkyTech Group, of which ProForger is a part, ships hundreds of thousands of orders every year (yes, you read that right), which allows us to keep our shipping costs down in a way that none of our competitors can match. Naturally, we want you, as a customer, to benefit from this.
Powder coating

Advantages of powder coating
Advantages of powder coating
- Protects against wear
- Withstands harsh environments (but does not provide full corrosion protection).
- Provides an exclusive finish
- Minimal maintenance requirements
- Environmentally friendly
- Extremely fast (we usually paint and ship the same day you place your order)
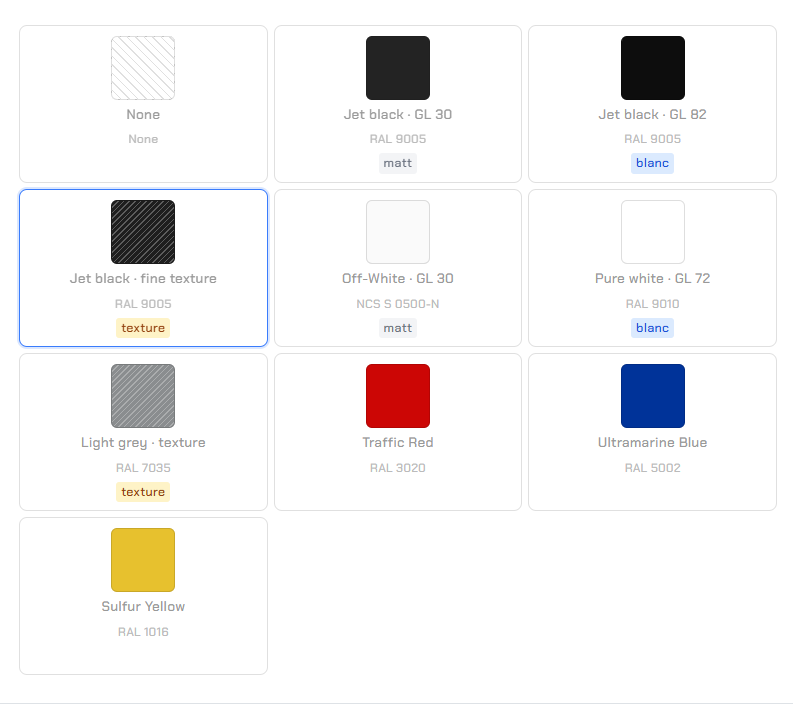
Select color
Select color
- Click the "Select coating" button
- Select a color shade
- Select color
Good to know
Powder coating typically builds up a thickness of 80–100 micrometers.